Python Django 實作(一) 使用政府開放資料庫
一、Django 的 mysql 資料庫:
首先到 MYSQL官網 下載安裝MySQL Community Server
下載 phpmyadmin 管理介面,之後導入資料庫較為方便
接著在DOC環境 使用pip安裝 python 的 mysqlclient 套件
pip install mysqlclient
1.導入 政府開放資料 至 Mysql 資料庫:
政府開放資料平台 進入此網站後挑選一個想要的資料,下載.CSV檔案
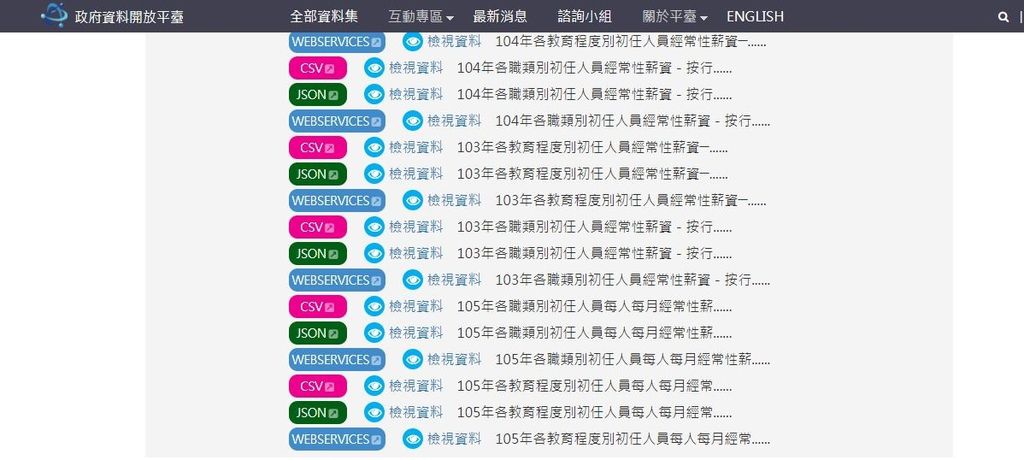
打開 phpmyadmin 創建一個資料庫
並導入剛才下載的 CSV 檔案
二、建立專案:
- 建立一個名為 firstdata 的專案
- 建立名為 firstdataapp 的 App
- 建立 templates 目錄、static 目錄
- 建立makemigrations 資料檔,並利用 migrate 將模型與資料庫同步
- 完成<setting.py>的設定
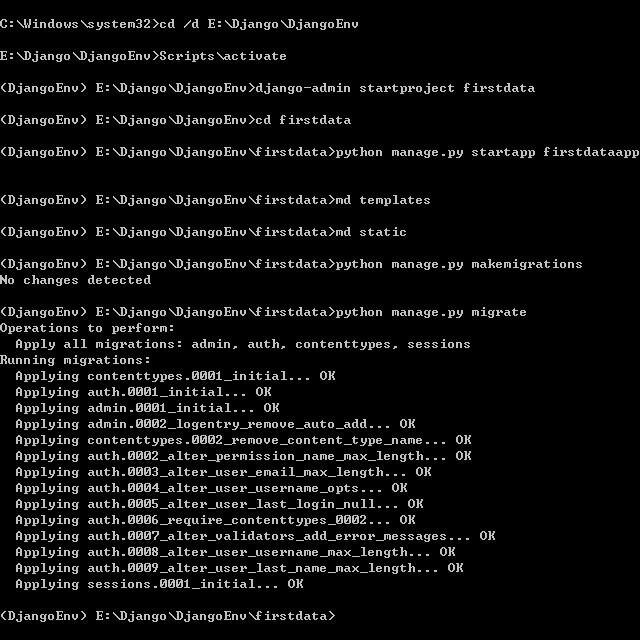
這裡<setting.py>的設定要比之前多設定 DATABASES 的部分(其餘的地方跟之前的設定相同):
DATABASES = {
    'default': {
        'ENGINE': 'django.db.backends.mysql',
        'NAME': 'firstdata',                      #輸入data的名稱
        'OPTIONS': {                              #添加嚴格命令,增加數據完整性
            'init_command': "SET sql_mode='STRICT_TRANS_TABLES'",
        },
        'USER': 'root',         #mysql帳號
        'PASSWORD': '00000000', #mysql密碼
        'HOST': '127.0.0.1',
        'PORT': '3306',
    }
}
三、同步 Mysql 資料庫至 Django:
- 使用 inspectdb 來生成 models.py
- 同步makemigrations 資料檔、使用 migrate --fake-initial 同步
- 註冊 models 至 admin
1.使用 inspectdb 來生成 models.py:
首先使用 inspectdb 語法生成 models.py,以我們剛才創建的 firstdataapp 為例子
python manage.py inspectdb > firstdataapp/models.py
這時候在 migrations 目錄中的 <models.py> 依據連接的 mysql 資料庫會自動生成
最下方的類別則是剛才導入政府開放平台的資料表
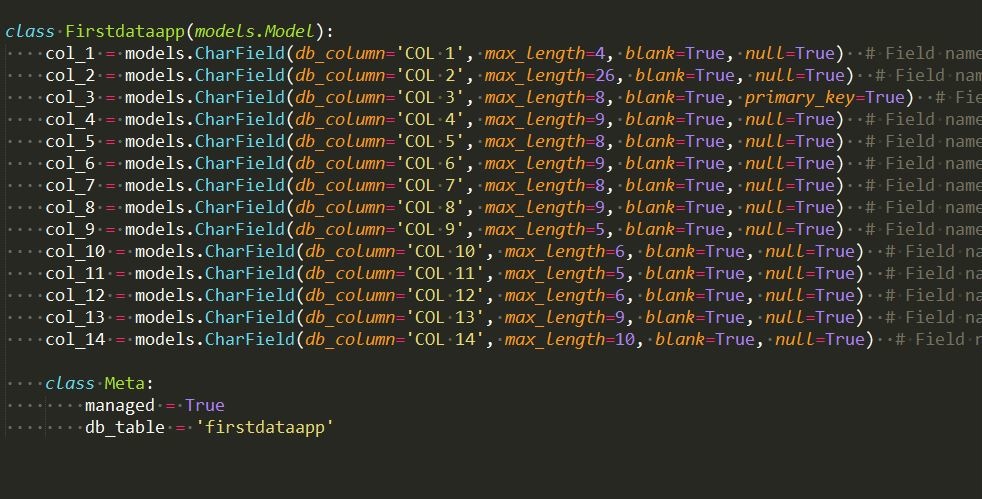
如果以後需要進行增刪查改操作,需要再Meta中設置
將預設的 False 改為圖中的 True
這邊要在其中一個欄位加上 主鍵(primary_key=True) 的屬性(此欄位數值不可重複)
若是沒有添加的話,Django會自動添加以下這行造成錯誤
id = models.IntegerField(primary_key=True)
若沒有super權限的話這行是會隱藏且無法刪除的
但是這將導致找不到 id欄位 造成資料庫出錯的問題
2.同步makemigrations 資料檔、使用 migrate --fake-initial 同步
這裡的migrate需使用 --fake-initial 參數,以免出錯
python manage.py migrate --fake-initial
3.註冊 models 至 admin
註冊 models 至 admin
這邊將幾個比較有內容的欄位先顯示出來
from django.contrib import admin
from firstdataapp.models import Firstdataapp

class Firstdataappadmin(admin.ModelAdmin):
    list_display=('col_1','col_2','col_3','col_4','col_12','col_13','col_14')
admin.site.register(Firstdataapp,Firstdataappadmin)
輸入「http://127.0.0.1:8000/admin/」來確認是否成功導入資料
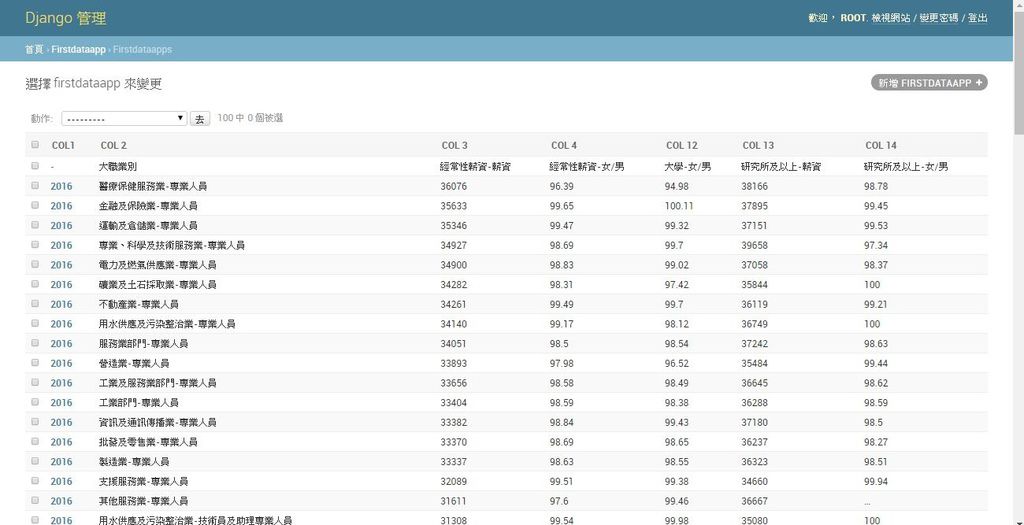
四、顯示資料:
- 在<urls.py>加入新的url路徑
- 在<views.py>寫入函式
- 創建模版並將資料代入
1.顯示一筆資料:
在<views.py>創建一個名為 listone 的自訂函數
由於我將col_3設為主鍵,這邊就以它的第一筆資料為例子,使用get()函式查找它
若回傳是多筆資料或是資料不存在,都會產生錯誤
但這邊先不做例外處理,以免出錯卻不知道錯在何處
from django.shortcuts import render
from firstdataapp.models import Firstdataapp

def listone(request):
    category = Firstdataapp.objects.last() #取整個資料表的最後一項(為分類)
    unit = Firstdataapp.objects.get(col_3="36076") #讀取第一筆資料

    return render(request,'listone.html',locals())
接著創建一個名為<listone.html>的模版,寫入想要顯示的欄位
category為整個資料表的類別,unit的內容為查詢的資料
<!DOCTYPE html>
<html>
<head>
    <meta charset="utf-8">
    <title>顯示第一筆資料</title>
</head>
<body>
    <h2>顯示 Django資料表一筆資料 </h2>
    {{category.col_1}}: {{unit.col_1}}  <br  />
    {{category.col_2}}: {{unit.col_2}}  <br  />
    {{category.col_3}}: {{unit.col_3}}  <br  />
    {{category.col_4}}: {{unit.col_4}}  <br  />
    {{category.col_12}}: {{unit.col_12}}  <br  />
    {{category.col_13}}: {{unit.col_13}}  <br  />
    {{category.col_14}}: {{unit.col_14}}  <br  />


</body>
</html>
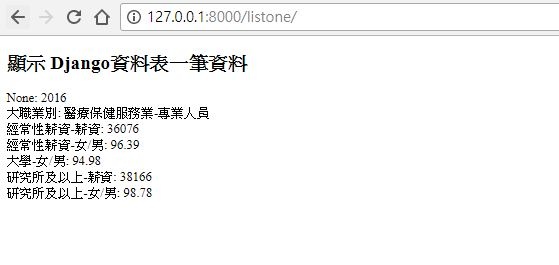
輸入「http://127.0.0.1:8000/listone/」來檢視是否成功匯入:
這邊顯示的None是由於原本資料表就沒有該欄位內容
1.顯示所有資料:
在<views.py>創建一個名為 listall 的自訂函數
使用 all() 函式顯示所有資料,並以 col_3 排序
def listall(request):
    category = Firstdataapp.objects.last()
    salarys = Firstdataapp.objects.all().order_by('-col_3') #依據 col_3 欄位遞減排序顯示所有資料
    return render(request,'listall.html',locals())
接著創建一個名為<listone.html>的模版,寫入想要顯示的欄位
<!DOCTYPE html>
<html>
<head>
    <meta charset="utf-8">
    <title>顯示所有資料</title>
</head>
<body>
    <h2>顯示 Django 所有資料</h2>
    <table border="3" cellpadding="2" cellspacing="2">
        <th>{{category.col_1}}</th>
        <th>{{category.col_2}}</th>
        <th>{{category.col_3}}</th>
        <th>{{category.col_4}}</th>
        <th>{{category.col_12}}</th>
        <th>{{category.col_13}}</th>
        <th>{{category.col_14}}</th>
        {% for salary in salarys %}
        <tr>
            <td>{{salary.col_1}}</td>
            <td>{{salary.col_2}}</td>
            <td>{{salary.col_3}}</td>
            <td>{{salary.col_4}}</td>
            <td>{{salary.col_12}}</td>
            <td>{{salary.col_13}}</td>
            <td>{{salary.col_14}}</td>
        </tr>
        {% endfor %}
    </table>

</body>
</html>
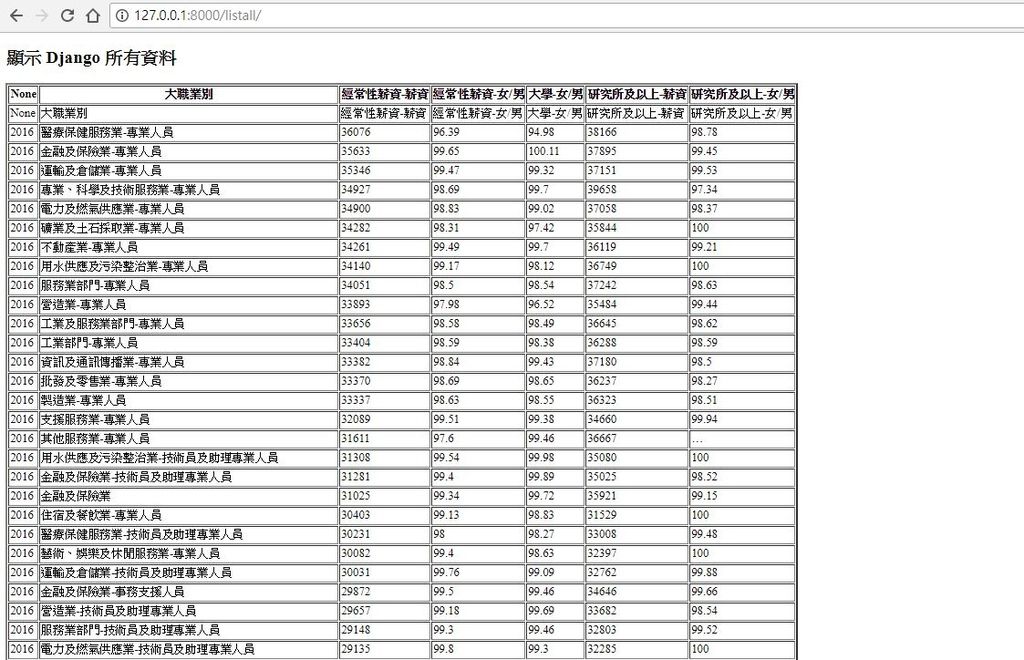
輸入「http://127.0.0.1:8000/listall/」來檢視是否成功匯入:


 留言列表
留言列表